Intro
First off, what is AIS?
The International Convention for the Safety of Life at Sea (SOLAS) requires certain vessels to be fitted with AIS, the “Automatic Identification System”.
AIS allows ships to report details about the ship along with position, heading, speed and some other navigational properties. The data is transmitted and received over VHF, and ships can use it as an aid to avoid collisions.
Quoting from the International Maritime Organisation:
The regulation requires AIS to be fitted aboard all ships of 300 gross tonnage and upwards engaged on international voyages, cargo ships of 500 gross tonnage and upwards not engaged on international voyages and all passenger ships irrespective of size. The requirement became effective for all ships by 31 December 2004.
So only ships above a certain size are required to use it, however other vessels may also choose to do so.
AIS data is a standard format broadcast on an open channel at 161.975 MHz and 162.025 MHz. That means any antenna tuned for these frequencies, with line of sight to a broadcaster, can receive and interpret the data.
Various services (many, it turns out - see my next article) collect AIS data via volunteer receivers and via satellites, and use it to paint a globalization picture of shipping movements.
The standard itself is proprietary and expensive to access, but there have been efforts to reverse-engineer it so that open-source projects can also read the data.
I’ve been experimenting with the dAISy HAT, which is an add-on for the Raspberry Pi. dAISy is a low-cost AIS receiver which, paired with a suitable antenna, can pick up these AIS messages.
Most guides I came across jump straight into installing dedicated relaying software or chart plotters. I’m not a huge fan of running fairly intrusive install scripts before I even know if the device is working, so instead I built up step-by-step so I could verify everything was working. As it happens, most of the functionality can be replicated by piecing together standard Linux tools.
Once you’re happy it’s working, you can of course install the full shebang, safe in the knowledge that if you have any issues you can diagnose the receiver yourself.
Why?
Because it’s fun! It’s interesting to interact with the world around you. If you live near a busy port or waterway, it can be interesting to plot what ships are passing and what they’re transmitting.
Bonus, if you forward that feed to one of the AIS collection services (see my next article), they sometimes give you free benefits as a result.
Shopping list
-
Raspberry Pi with SD card and power supply (resellers)
-
AIS antenna (see below)
-
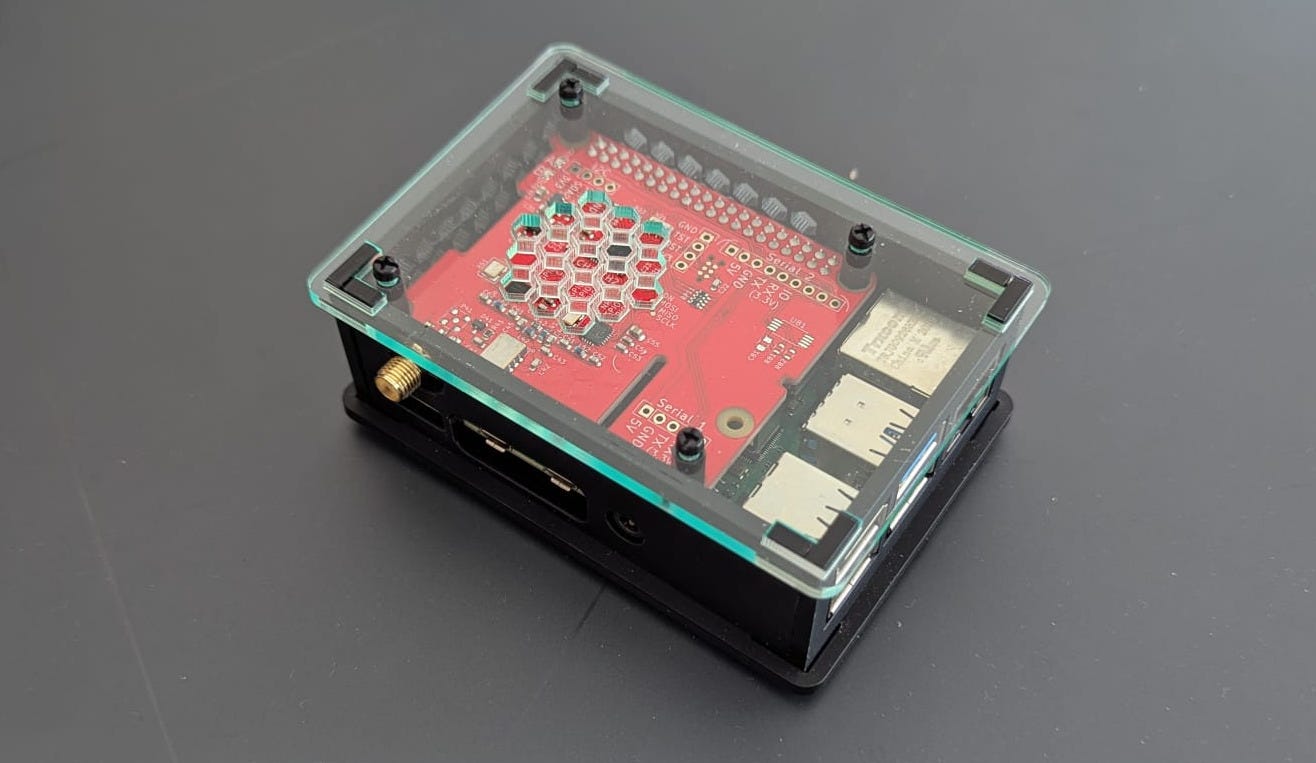
(optional) Raspberry Pi 4 case for dAISy HAT (wegmatt, thepihut)
The Wegmatt purchase page claims compatibility with the Raspberry Pi 1(A+/B+) through 5 and Pi Zero. I had a 4B already which is what I’ve used for this project.
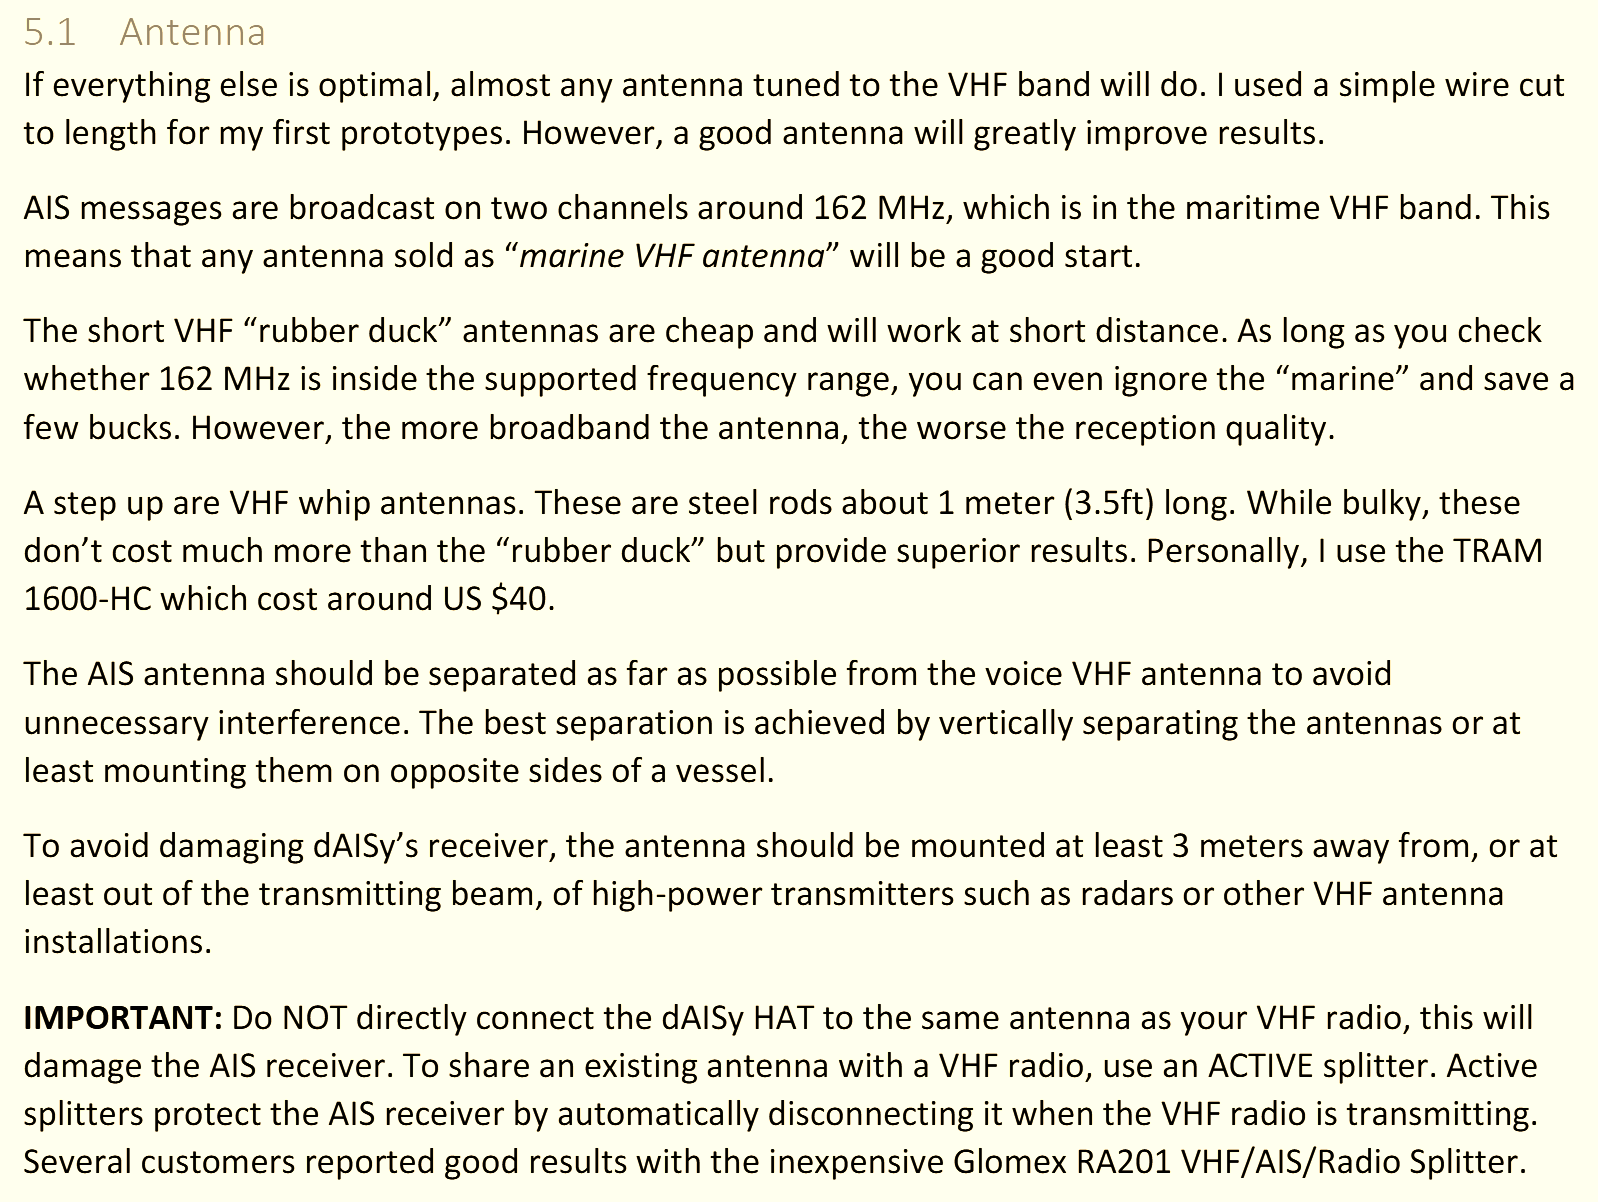
Note on Antennas
The instruction manual has some good advice on picking an antenna. Quoting:
4.6 RF connectors
The edge-mount antenna connector of the dAISy HAT is female SMA, standard polarity.
[…]
The dAISy HAT is matched for an antenna with an impedance of 50 ohms, which is standard for marine VHF communication
So basically any antenna will do as long as it has 50 ohm impedance, and it supports the right frequencies (161.975 MHz and 162.025 MHz).
It’s also worth reading section 5.1 (at time of writing) of the manual, quoted here:
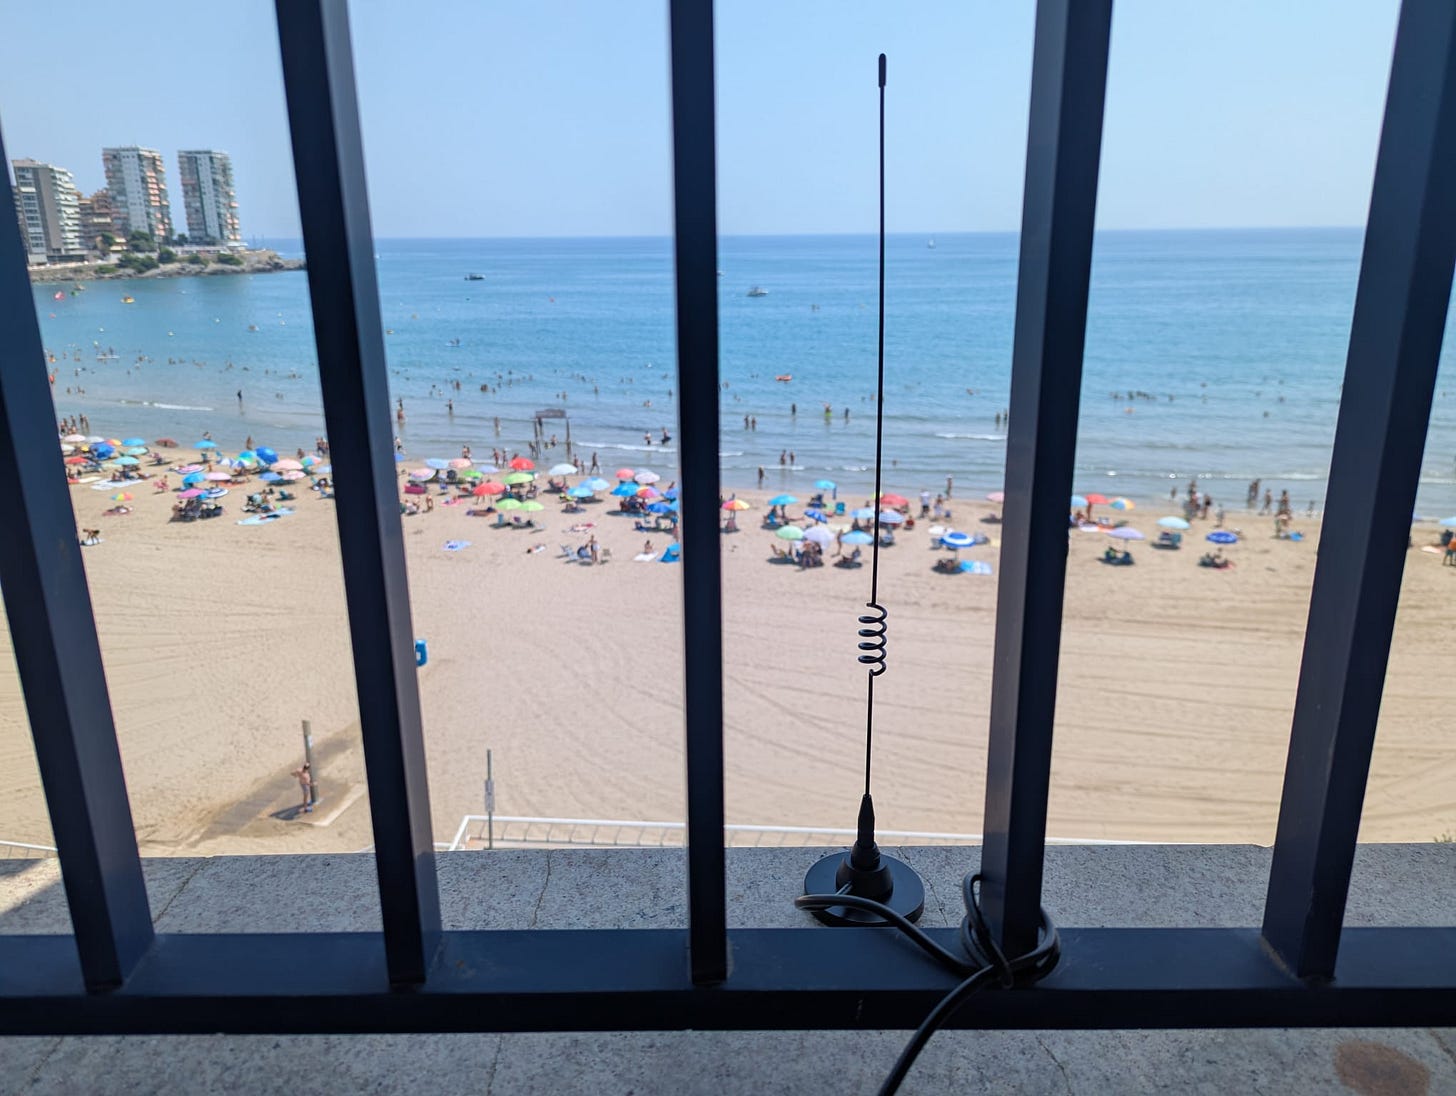
I went with this one because it was cheap and fairly long while still fitting in a backpack: https://amzn.eu/d/8MUuNYe.
When it arrived I realised the adapter it included was also to SMA female, so I had to buy an SMA male-male connector to plug it in to the board. I could have also bought the SO-239 to SMA pigtails that wegmatt offered with the board.
Other useful hardware
A ‘portable crash cart adapter’ (effectively a KVM adapter that plugs into your laptop) is useful for setting up the Raspberry Pi, before it has network connectivity. There’s a few varieties on the market, sometimes called I use a Sipeed NanoKVM-USB which is much cheaper than others I’ve seen.
This isn’t entirely necessary as you can configure the SD card image with network credentials and an SSH keys to log in remotely, but it’s pretty handy for connecting to it on the go.
Putting it together
Wegmatt provides a useful collection of links to docs: https://wegmatt.com/docs.html
Follow the case guide to put together the Raspberry Pi, HAT and surrounding case.
For now we’ll start with Raspberry Pi OS because that’s what the quick-start guide uses. Once we’ve confirmed it’s working we can swap out the OS later on.
Following the instructions at Raspberry Pi OS to write the OS to an SD card. You can either download the Raspberry Pi Imager, or if you’re more confident you can download the ISO image and write it to the SD card with your tool of choice.
Once that’s done, slot the SD card into the Pi and plug in the power.
First login
If you haven’t pre-configured the device with network and SSH settings, you’ll need to connect the HDMI out and USB to a screen and keyboard, or to a NanoKVM in my case, to configure the device.
If you have pre-configured it, you can find out the IP from your router (via its admin portal) and SSH directly into the Raspberry Pi.
Before you do anything else, update the Pi as described in Raspberry Pi OS. From the SSH session, run (possibly with sudo):
apt update && apt full-upgrade
If you’re using the GUI, open up a terminal window and run the command there.
We’ll also install some useful tools that we’ll use later on (or you can install them as and when you need them):
apt install ncat screen tmux pv
Now follow the quick start guide to activate the serial connection and reboot the device. This involves running sudo raspi-config and selecting the options from the guide.
Verify the hardware
The dAISy HAT should now be available as a serial device on the Raspberry Pi. The manual states the following parameters:
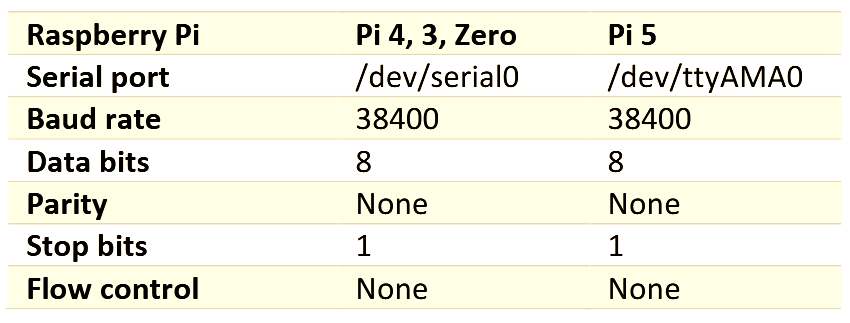
You can connect to the device using screen, passing the baud rate as the second parameter:
screen /dev/serial0 38400
Note : I use serial0 because I have a Pi 4. If you have a Pi 5 you should replace that with ttyAMA0 here and for the rest of the article.
Press ESC to access the HAT settings. If you see something like the following, then you the connection between the Raspberry Pi and the HAT is working correctly.
dAISy v5.12 - dAISy HAT (5232) (C)2014-2025 Adrian Studer

Radio 1: 161.975MHz AIS1        Radio 2: 162.025MHz AIS2        Format: A/B
Serial 2: disabled - NMEA out   Debug: off
Reset GPIO18: on        Sleep GPIO17: on        Sleep Serial IO: off

Configure:
0-3     Set Serial 2 to 4800, 9600 or 38400 baud (1-3) or disable port (0)
S       Toggle function of Serial 2 as NMEA output or NMEA input
C       Configure AIS channels
R       Toggle control of reset via Raspberry Pi GPIO18
L       Toggle control of sleep via Raspberry Pi GPIO17
I       Toggle control of sleep via Serial IO
#       Save current settings

Debug:
D       Toggle debug messages on/off
N       Read current RSSI (indication for noise)
V       Show statistics for valid messages received
T       Output NMEA test messages
B       Launch bootloader to update firmware

ESC     Return to AIS receive mode
> entering AIS receive mode
Press then ESC again to go back to ‘receive’ mode. To exit screen, press Ctrl-A, then K, then Y.
As an alternative to screen, you can install tio which has a slightly more intuitive interface:
sudo apt-get install tio
tio -b 38400 /dev/serial0
Output:
[10:26:13.840] tio v2.5
[10:26:13.841] Press ctrl-t q to quit
[10:26:13.842] Connected
If you’re within line of sight of any AIS transmitters, you might start getting messages through when you’re in ‘receive’ mode. If not, it’s time to pack up and head to a port or river and see what you can pick up. You’ll have to think about how to power and control the device when you get there - for power you could bring a power pack or run it off your laptop, and for control you can either bring a travel router so you can SSH in, or use a crash cart to connect to the HDMI and USB ports.
Once you’re within range, you should start seeing raw AIS strings appear when you’re running the screen to tio commands:
!AIVDM,1,1,,B,15BgDT002oP4KfNFT>mhr@iD0@H>,0*7E
!AIVDM,1,1,,A,13ce`o002H03c:lFFr2QH17H0@JR,0*1E
!AIVDM,1,1,,A,H3GQeDlUC=D4HeU00000000`2110,0*47
!AIVDM,1,1,,A,13ce`o002H03cR<FFuAiGi4@053@,0*28
!AIVDM,1,1,,A,B3GQqDh00809oo5fqAkQ3w`5oP06,0*5C
!AIVDM,1,1,,A,D028is1Mdffp,0*2A
Both screen and tio take a desired baudrate as a parameter. To use shell builtins or tools like cat which don’t accept a baud rate, as we’re going to do in the next section, you can use stty to check what baudrate is set for that device:
stty -F /dev/serial0 speed
Output:
38400
If the baud rate is not 38400, you can set it also through stty:
stty -F /dev/serial0 38400
Using the data
Printing data
Now’s the time to play with the data! Before you starting installing clever bits of AIS software, it’s worth seeing what you can do with common Linux tools and piping.
Let’s start with saving the data to a file:
cat /dev/serial0 | tee -a messages.txt
!AIVDM,1,1,,B,B3GQeDh00@09ii5frIsQ3wdUkP06,0*40
!AIVDM,1,1,,B,15Tk1J001qP4=cRFRKtWhV<h08?e,0*09
!AIVDM,1,1,,B,13ce`o002G046DhFJbjQG14l08?p,0*79
!AIVDM,1,1,,A,13ce`o002G046JRFJcV1GA70059D,0*03
This will append the messages to a file called messages.txt, while also outputting them to the screen.
To see how many messages we’re getting, we can insert pv with its --average-rate flag. Here we pipe the output to /dev/null to discard it so it doesn’t interfere with the output of the rate.
pv --line-mode --average-rate /dev/serial0 > /dev/null
[ 370m/s]
We’re getting about 370 ‘milli-lines’ per second, so about 22 per minute.
These raw messages are pretty hard to understand. How can we interpret them?
The AIVDM/AIVDO protocol decoding writeup provides a breakdown of what the messages mean.
The squidpickles/ais repo is a Rust library which includes a simple CLI called aisparser. We can install it by first installing the Rust compiler, then using it to install the aispraser tool CLI:
curl --proto '=https' --tlsv1.2 -sSf https://sh.rustup.rs | sh
cargo install ais
cat /dev/serial0 | aisparser
aisparser will print each line it receives on STDIN, along with its interpretation of that line. For example:
"!AIVDM,1,1,,A,13ce`o002G047DNFJkciFi5000Se,0*10\r" Some(PositionReport(PositionReport { message_type: 1, repeat_indicator: 0, mmsi: 247163100, navigation_status: Some(UnderWayUsingEngine), rate_of_turn: Some(RateOfTurn { raw: 0 }), speed_over_ground: Some(15.1), position_accuracy: Unaugmented, longitude: Some(0.89879835), latitude: Some(39.179813), course_over_ground: Some(34.7), true_heading: Some(34), timestamp: 32, maneuver_indicator: None, raim: false, radio_status: Sotdma(SotdmaMessage { sync_state: UtcDirect, slot_timeout: 0, sub_message: SlotOffset(2285) }) }))
If you want to leave any of these running while you’re disconnected, you can run tmux, then start your chosen command, then press Ctrl-B, then D to disconnect from the session. tmux will continue to run, and you can re-join the session later on by connecting to the Raspberry Pi again and runnning tmux attach.
Visualising the data
Now that we have a data stream, you have a few options for visualising the data, depending on your preferences:
-
Attach a screen to the Raspberry Pi, then run a local chart plotter like OpenCPN to receive the data from the serial port and visualise it.
-
Make the data available on a TCP port and connect to it from another device, such the AIS-catcher Android app or Navionics
-
Send the data over TCP/UDP to a remote service such as AIS-catcher, aishub or MarineTraffic and view the results on their respective websites
We’ll go through each in turn, and later we’ll look at how to combine them.
Option 1: run a local chart plotter
OpenCPN is a large bit of software with a lot of cool features that go beyond the scope of this article, so I won’t go into a whole lot of detail here. There are instructions at at OpenCPN - Raspberry Pi on installing OpenCPN, and this article explains how to connect to a serial connection: OpenCPN setup with AIS/GPS/SeaTalk/NMEA Mux.
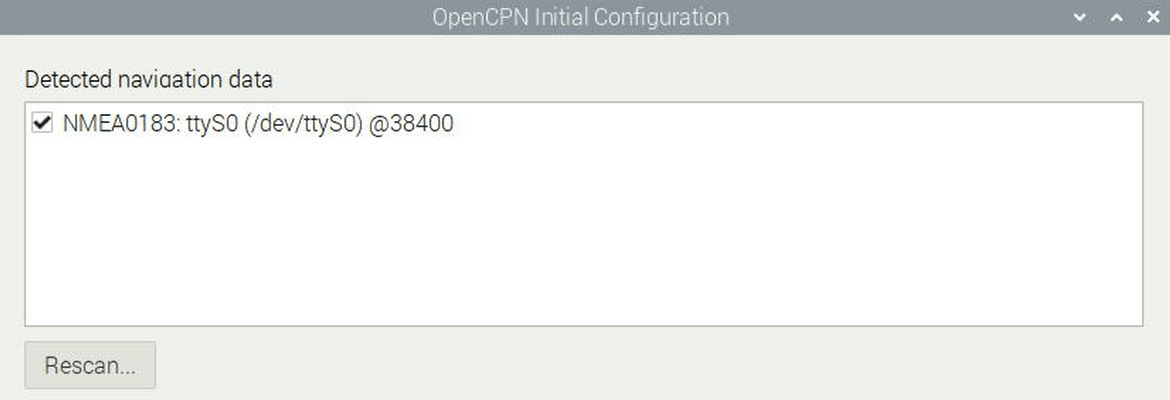
When you first run OpenCPN, it’ll scan for local data sources:
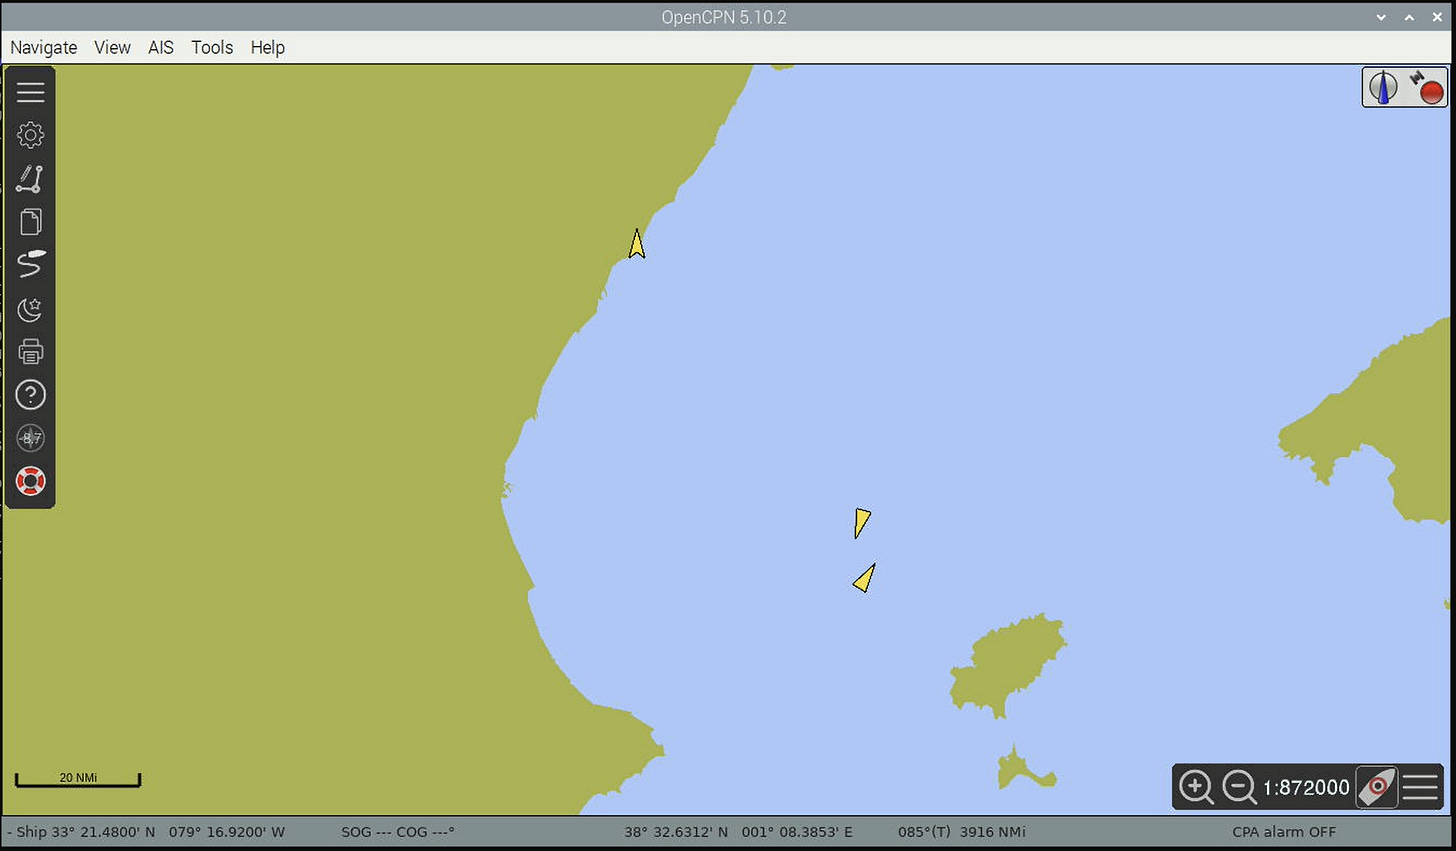
If you select the default options for the rest, you’ll then get a map with the ships positions you’re picking up:
Option 2: make the data available on a TCP port
The ncat utility (which we installed earlier) can listen for connections and respond to them with a configurable output. First, pick a free port, such as 10110 (the standard for NMEA 0183 data, although any port will do) Then run
ncat -l 10110 --sh-exec "cat /dev/serial0" --keep-open
-l 10110 runs ncat in listen mode on that port. -c runs the subsequent argument on each connection and pipes the output to the client, and --keep-open prevents ncat from shutting down after the first single connection terminates.
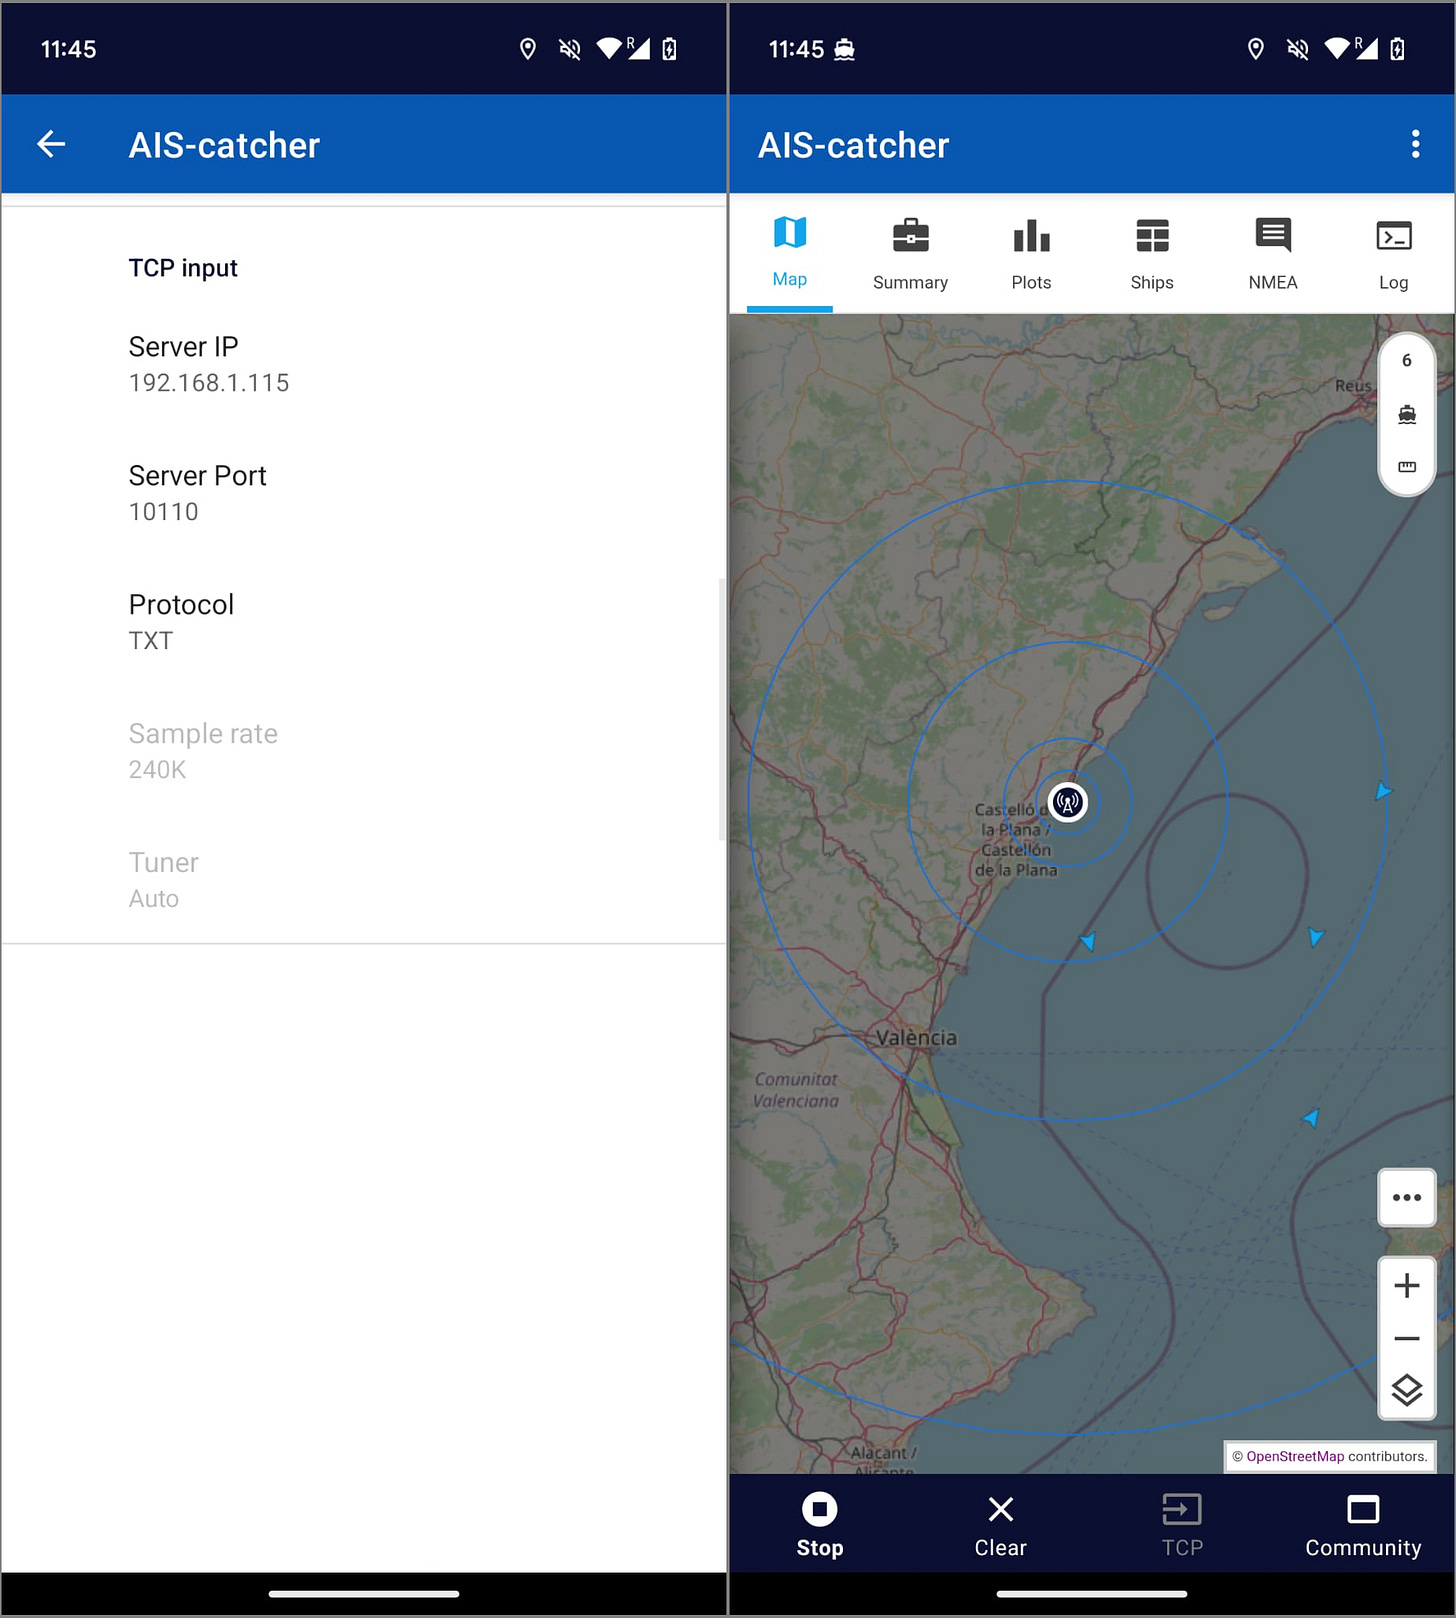
You can now install something like AIS-catcher-for-Android on your mobile device, and configure it to look for a TCP connection on your Raspberry Pi:
Because only a single process can read from a serial port, only a single connection will be able to get the data. ncat has another mode that broadcasts data to all clients, if you pass in via STDIN:
ncat -l 10110 --keep-open </dev/serial0
And you can optionally use tee to write a copy to STDERR first to monitor the output:
tee /dev/fd/2 </dev/serial0 | ncat -l 10110 --keep-open
The downside is that ncat will only read from STDIN on the first connection, so the serial data will queue up until the first client connects - which might not be what you want. One option is to run a ‘dummy’ client to act as that first connection and discard the data, so ncat is always reading from the serial connection. This will give it the right behaviour (any subsequent connections will all get a copy of the most up-to-date data), although it might feel a bit wasteful to have it running all the time:
# script.sh
ncat -l 10110 --keep-open </dev/serial0 &
ncat 127.0.0.1 10110 >/dev/null
Option 3: send the data to a broker service
Note : this will make the data you receive publicly available.
Sign up to one of these services, following the linked instructions:
Depending on which one, they’ll provide you with an IP address and TCP or UDP port to connect to.
As well as listening for connections in the previous example, ncat can also connect to remote hosts, makes it possible to pipe data to an IP address and port:
# TCP:
nc $IP $PORT </dev/serial0
# or UDP (note the -u flag):
nc -u $IP $PORT </dev/serial0
For example, if you’re told to send to you an email with IP 203.0.113.0 and UDP port 10110, you’d run
# Not a real address and port! Use the ones given to you when you sign up
nc -u 203.0.113.0 10110 </dev/serial0
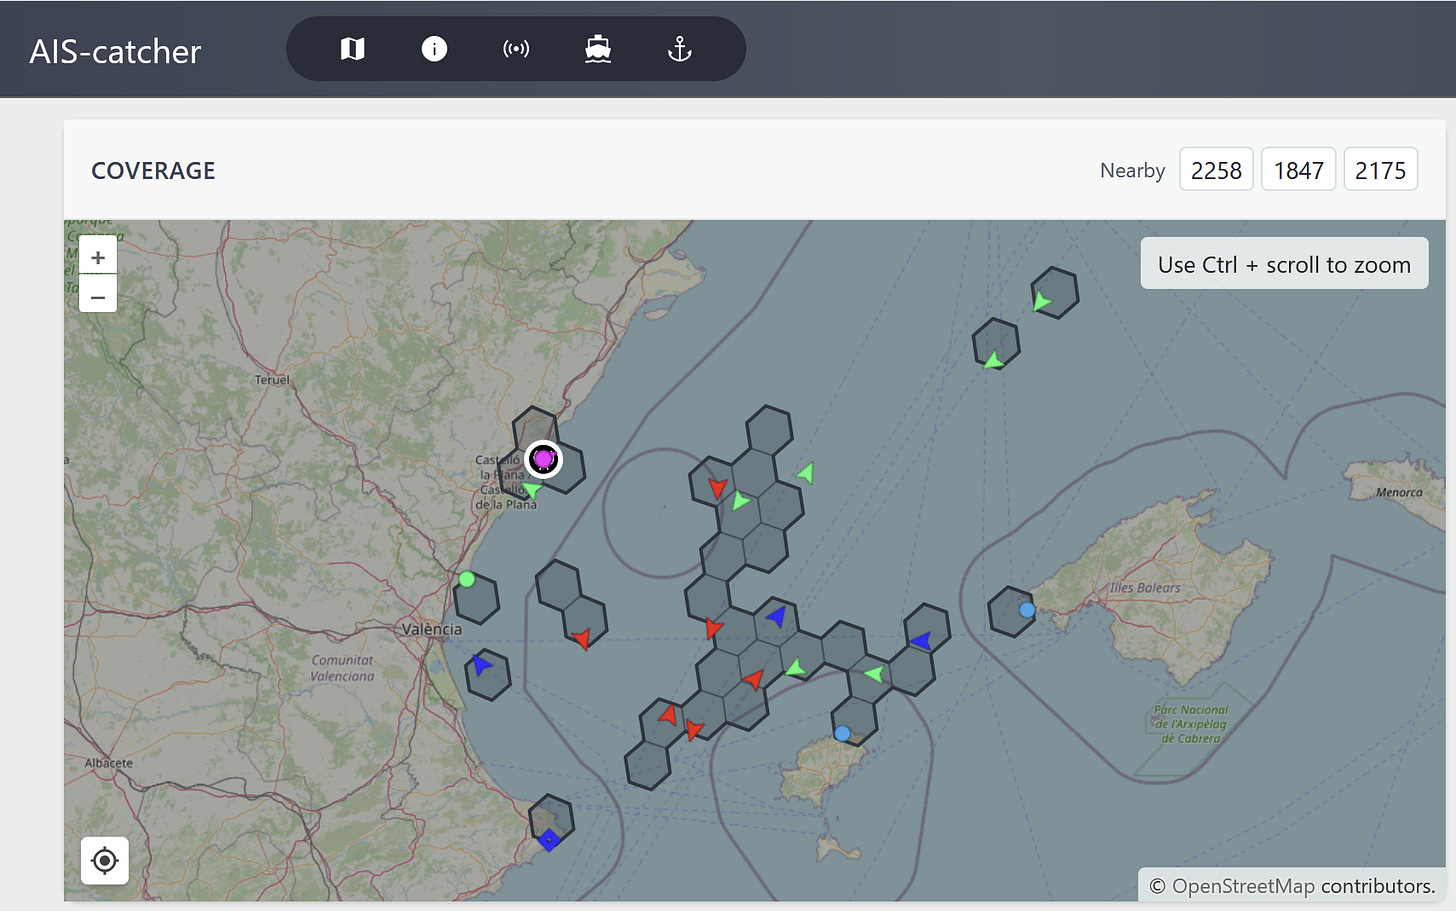
Soon you’ll start seeing the results on the ais-catcher website:
If we want to see the output at the same time as sending it, we can use tee once again to split a copy between two outputs. Here we spawn ncat as a subshell, and the >(…) syntax causes the subshell’s STDIN to be passed to tee as a parameter. tee will copy from STDIN to STDOUT, while sending an additional copy to the location specified in its argument:
cat /dev/serial0 | tee >(ncat -u host1 10110)
What about sending to multiple destinations? You can either chain instances of tee together, or it turns out tee can take multiple arguments and send a copy to each of them:
cat /dev/serial0 | tee >(nc -u host1 10110) | tee >(nc -u host2 10110)
or:
cat /dev/serial0 | tee >(nc -u host1 10110) >(nc -u host2 10110)
If you want to be pedantic, you can avoid the Useless Use of Cat by piping the serial input straight into the first tee:
tee </dev/serial0 >(ncat -u hot1 10110) >(ncat -u host2 10110)
Filtering data
Before you send your data to a broker, you might want to filter out duplicate and invalid messages to save on bandwidth.
To go about this in the spirit of this article I’ve written a tool called ais-filter, which takes messages via STDIN, filters out duplicates on a configurable window span and any invalid messages, and writes them to STDOUT.
ais-filter writes logs to STDERR (configured by -q and -v switches), so have the benefit of being able to read the messages as they come through
If you already have the Rust compiler installed from the previous page, you can run the following to install and run it:
cargo install --git https://github.com/JaimeValdemoros/ais-filter.git#0.1.0
ais-filter -vvv --decode --sample 60s </dev/serial0 | ncat -u host1 12345
The --decode flag will decode messages before printing them, and --sample flag will de-duplicate messages on a configurable interval (in this case per minute).
Running and restarting automatically
Once you’ve got a pipeline you’re happy with, you’ll want it to run automatically when your Raspberry Pi boots up, and to be restarted if it fails.
The simplest way to do this is to write a systemd file. systemd is an incredibly powerful manager for arranging services to be started and monitored, although here we’ll only need a small piece of its usecase.
Here we’ll choose to run the service as our user, with two benefits:
-
It’s always better to run a service with fewer privileges
-
We currently have
ais-filterinstalled only for our user, sosystemdwill find it more easily.
To set this up, you can write a config file at ~/.config/systemd/user/ais.service like the following, replacing the command with your command of choice:
# ~/.config/systemd/user/ais.service
[Unit]
Description=AIS message processing
After=basic.target

[Service]
# Check for connectivity before starting
ExecStartPre=/bin/nm-online -q
ExecStart=/bin/bash -c 'tee </dev/serial0 >(ncat -u host1 12345)'
Restart=always

[Install]
WantedBy=default.target
Note that since ExecStart doesn’t spawn a full shell, we need to explicitly invoke bash to run a subshell that can handle pipes.
Ideally we’d add an ordering dependency on network-online.service, but it seems it’s not available in user-level service. Instead we use ExecStartPre as suggested in this post to check for connectivity before starting the main service.
To make it a bit easier to manage, we can break out the command into a script, say at ~/ais.sh: (make sure you run chmod +x ~/ais.sh to make it executable!)
#!/usr/bin/env bash
set -Eeuo pipefail

stty -F /dev/serial0 38400

echo "Starting..."
ais-filter -q --sample 60s </dev/serial0 |
    tee --output-error=exit \
        >(ncat --send-only -u host1 10110) \
        >(ncat --send-only -u host2 10110)
We can then update our service file to call this script:
# ~/.config/systemd/user/ais.service
[Unit]
Description=AIS message processing
After=basic.target

[Service]
# Check for connectivity before starting
ExecStartPre=/bin/nm-online -q
# %h expands to the home directory
ExecStart=%h/ais.sh
Restart=always

[Install]
WantedBy=default.target
In the script I’ve adjusted the commands to make it a bit more resilient:
-
Include
set -euo pipefailas recommended by Use Bash Strict Mode (Unless You Love Debugging), as well as -E so it extends to subshells. -
Run
sttyat the start of the script in case it got misconfigured -
Pass
--send-onlytoncatso we ignore any output coming the other way -
Pass
--output-error=exitto tee so it exits if any of the pipes exit (as a result of a connection error) and trigger the service to restart
Now we just need to activate it:
systemctl --user daemon-reload    # pick up changes
systemctl --user enable --now ais # activate and start the new service
You’ll also need to tell systemctl not to shutdown the services when you log out:
sudo loginctl enable-linger $USER
Finally, we can see the logs with journalctl:
journalctl --user-unit ais
Output:
Aug 11 11:40:07 raspberrypi systemd[756]: Started ais.service - AIS message processing.
Aug 11 11:40:15 raspberrypi bash[4332]: [2025-08-11T10:40:15Z DEBUG ais_filter] AisSentence { ... }
More interesting tools, and wrapping up
At this point you should now have a Raspberry Pi that boots up and automatically starts streaming data to the location(s) of your choice, or listening for connections and making the data available to clients. Success!
Now, you might something with a few more bells and whistles, maybe a web interface when you can keep an eye on it. Hopefully at least you’ve now got a good understanding of how the hardware works and how you can test and manipulate its output.
If so, you might want to check out one of the following:
- AIS-catcher
Brought to you by the folks from aiscatcher.org.
It can take AIS data from a variety of sources, not just serial, and send it to a number of destinations.
See the docs at docs.aiscatcher.org for how to set it up.
- AIS dispatcher
This time from AISHub, It takes a TCP or UDP source, performs downsampling (like ais-filter, although probably more effective), and sends it to one or more targets.
If you’re installing via the Linux install script, make sure you download it and read what it does before running it - it fiddles around with users and groups to install the service, which you might not be expecting!
- Kplex
Another program for combining and dispatching AIS streams. I’ve not used it directly, but it has some interesting features:
- Multiple source failover, with priorities
- Filtering on properties
- Rate-limiting
Happy hacking!